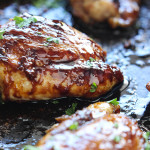
Five ingredients and 20 minutes are all it takes to enjoy this honey garlic chicken with the much-loved sauce that won over kitchens everywhere.
Today we’re making some delicious, honey garlic chicken. With the same, much-loved flavor profile of honey garlic shrimp and honey garlic salmon, we get to enjoy everyone’s favorite sauce with boneless, skinless chicken breasts or thighs. It’s an addictive sauce with a sticky, sweet and savory glaze that works great with almost every kind of protein.
It’s simple to cook, quick and easy, but so rewarding. And it’s 20-25 minutes (depending on the thickness of your chicken) from start to finish without sacrificing any flavor. If you’re in the mood for something with even more flavor, try this honey garlic butter chicken recipe which uses this recipe as a base.
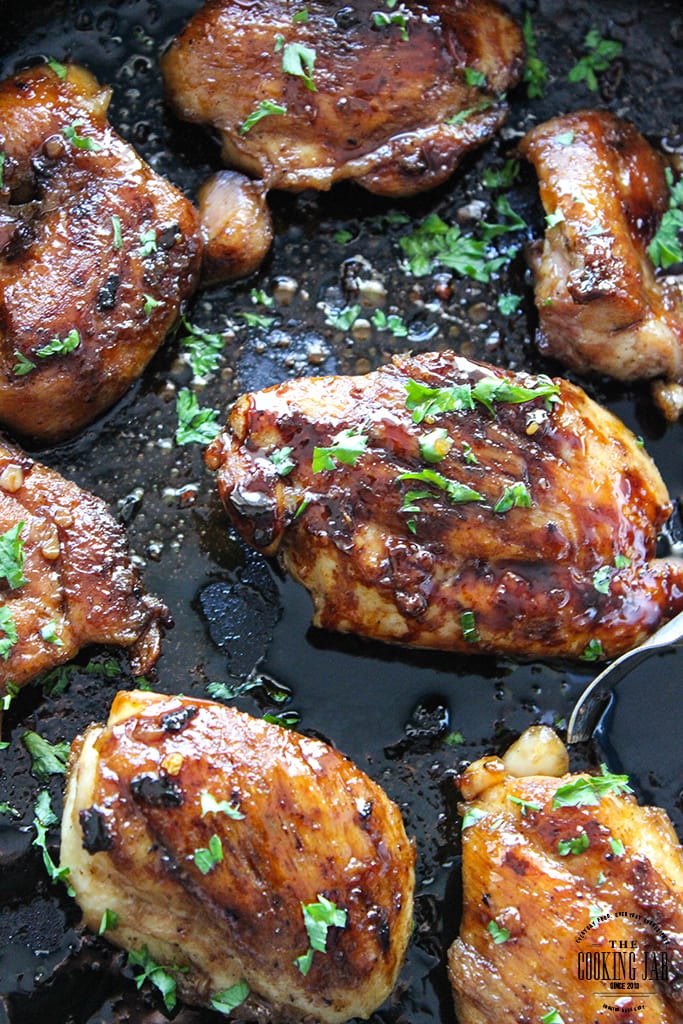
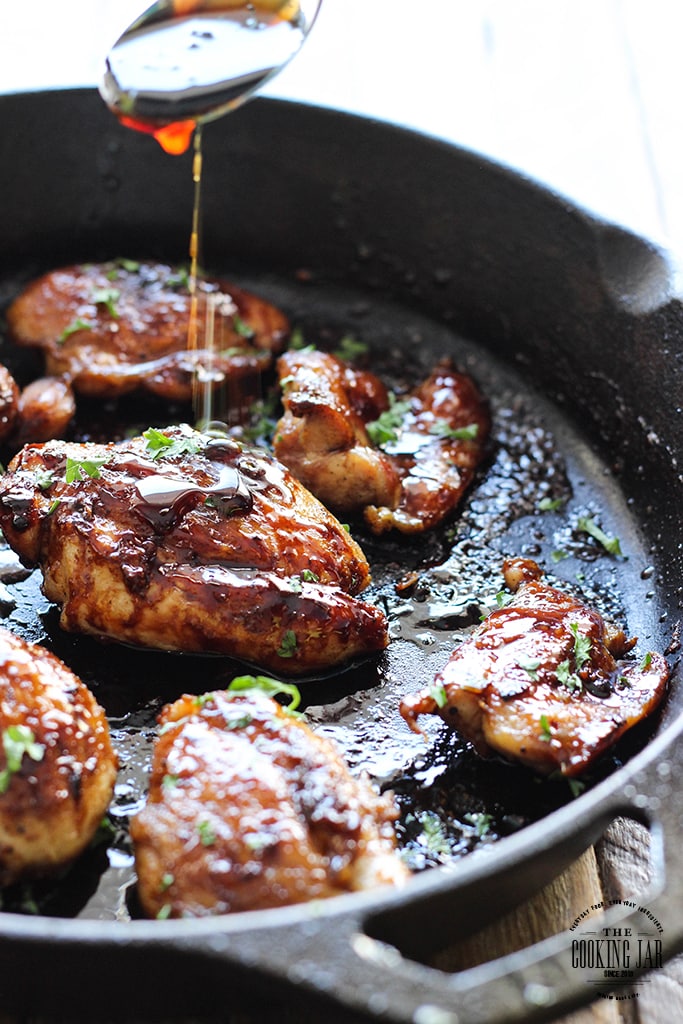
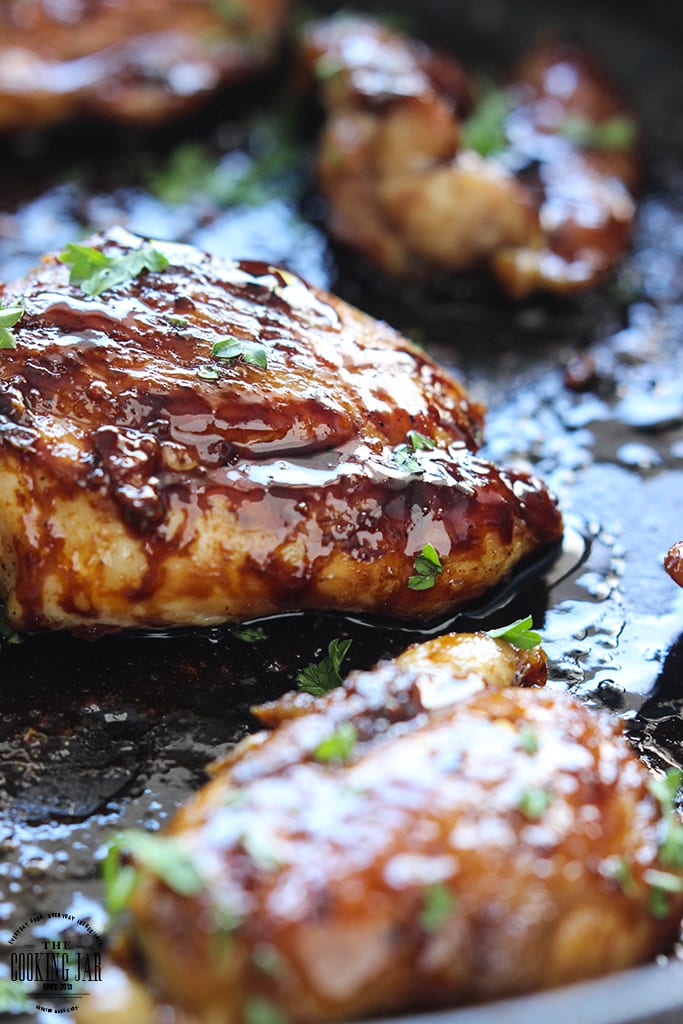
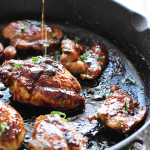
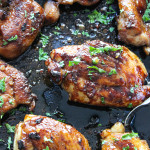
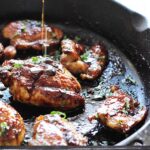
Don’t worry about all the shiny stuff on the pan that looks like oil. It’s actually the sauce. Loads and loads of sauce! This is the stuff that’ll give your chicken that wonderful glaze. I used boneless, skinless chicken thighs because I feel they are juicier but if you prefer chicken breasts, this will work too.
It’s a great answer for quick weeknight dinners. Serve with a side of rice or mashed potatoes with some greens on the side like green beans, broccoli, or asparagus. There are plenty of ways to enjoy this. Let’s start cooking!
How To Make Honey Garlic Chicken (1 Min Video)
What You Need For Honey Garlic Chicken
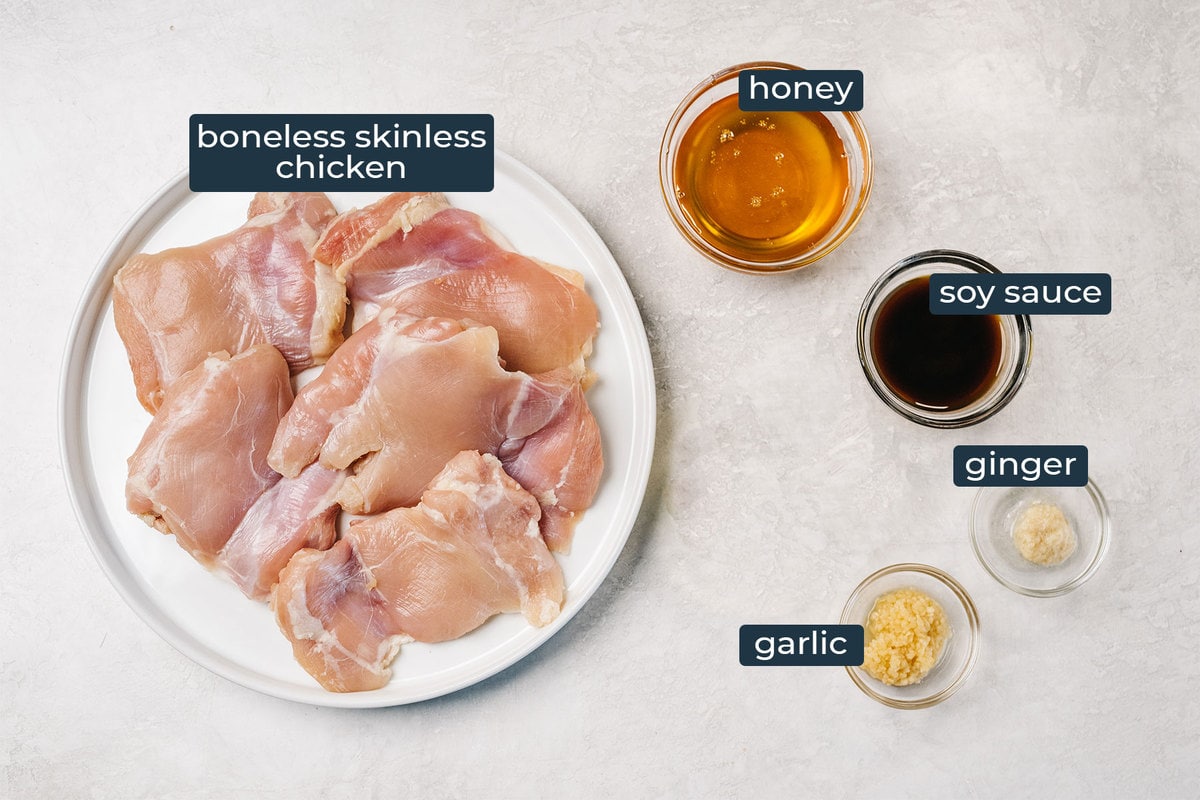
This one is SO simple and I wasn’t lying when I said you only need five ingredients. You can use either boneless, skinless chicken breasts or chicken thighs. Both regular soy sauce and low sodium soy sauce will work.
And if you don’t have fresh garlic and ginger on hand, feel free to substitute with garlic powder and powdered ginger. Ginger gives the sauce a warm flavor but if you’re not a fan, you can absolutely leave it out too. It will not break the recipe. And if you want to build on this recipe for more flavor, try adding in a splash of lime juice or a few dashes of red pepper flakes.
HONEY GARLIC CHICKEN RECIPE TIPS
One pound of boneless, skinless chicken thighs turned out to be about four thighs for me. So if you sub with chicken breasts, go for one pound’s worth. Cut the thighs in half to make them cook quicker and cook them in two batches so you’re not overcrowding the pan. This also makes sure the chicken sears properly instead of steaming.
If your breasts are slightly on the thicker side, it might be worth it to cut it up lengthwise as well, to cut that thickness in half so it’ll cook faster and more evenly. Also make sure the thighs/breasts are dry before we cook them so they brown up nicer (and so you don’t get attacked with angry, spitting oil).
Start heating up the pan over medium-high heat in a 10″ skillet. I used about two tablespoons of oil, just enough to coat the bottom of the pan. Since there isn’t any skin on the chicken to render fat, we’ll be relying solely on the oil you add to the pan to sear them.
It should take about 3-4 minutes to sear and cook each side, depending on the size of each chicken piece. The smaller pieces will end up crispier than the bigger ones. Keep an eye on them and remove them from the pan earlier if needed. After the first side of the chicken is done, reduce the heat to medium to stop the pan from smoking before flipping the chicken over. You will be cooking from medium to medium-low heat from here on out.
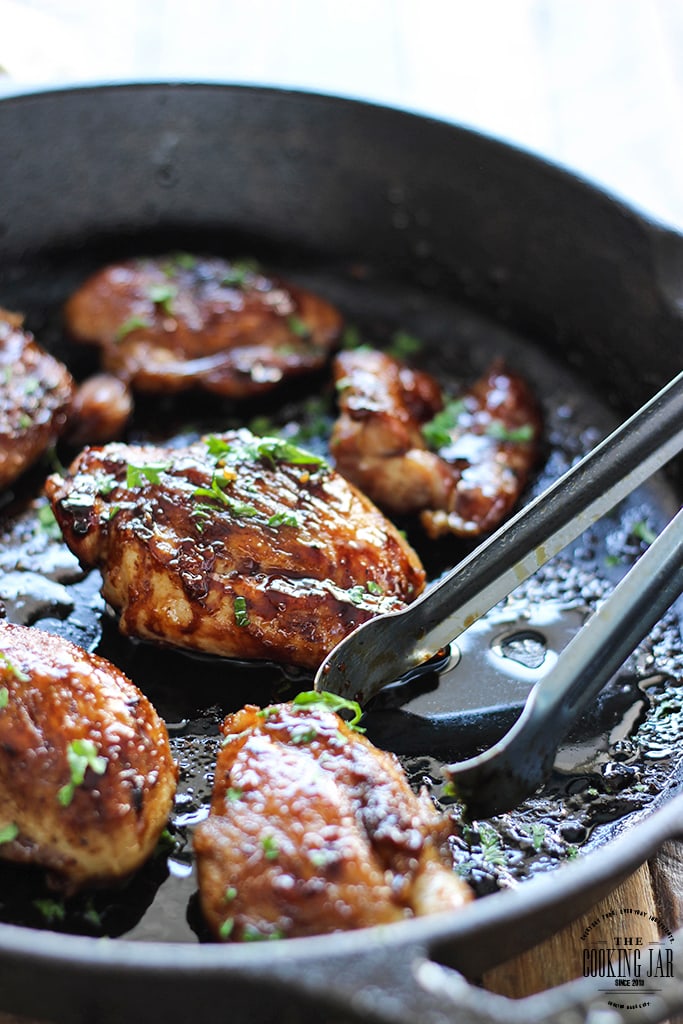
Even though we patted the chicken dry with paper towels earlier, there might still be some angry spitting from the oil. So it’s always worth it to invest in a splatter guard. And wear an apron! Once it’s all cooked, drain the chicken on some paper towels and remove any excess oil from the pan, leaving just a little to saute the aromatics. Saute the garlic and ginger until fragrant, add the chicken back to the pan, and pour in the honey and soy sauce mixture.
TIP: Make sure to keep the heat on medium-low as boiling the sauce too fast will burn and harden it into a sticky mess. And even though sticky sauce sounds great, burning it changes the sweetness of the honey to bitterness. It’s not too tasty.
Flip the chicken in the sauce to coat both sides and once the sauce has reduced and we’re done. That’s it! Go enjoy your glazed chicken and brag about how you’re a cooking expert. There’s no need to tell anyone it was only five ingredients! 😉
Customize It!
- Add more flavor – Add some heat with a few dashes of red pepper flakes. You can cut the sweetness of the sauce with some apple cider vinegar or a drizzle of lime juice. For a smoky flavor, do a finishing drizzle with sesame oil or sprinkle with toasted sesame seeds.
MORE HONEY GARLIC RECIPES TO TRY
- Honey Garlic Butter Chicken
- Honey Garlic Shrimp
- Crispy Honey Garlic Chicken
- Honey Garlic Salmon
- Slow Cooker Honey Garlic Chicken
- Air Fryer Honey Garlic Salmon
Did you make this recipe? Rate it!
♡ If you liked this recipe, giving it a star rating ★★★★★ in the comments below really helps! For more recipes, subscribe to my newsletter or follow me on Facebook, Instagram and Pinterest.
Honey Garlic Chicken
- Total Time: 20 mins
- Yield: 4 1x
Description
Five ingredients and 20 minutes are all it takes to enjoy this honey garlic chicken with the much-loved sauce that won over kitchens everywhere.
Ingredients
- 1 lb. boneless, skinless chicken thighs/breasts
- 2 medium cloves garlic / 2 teaspoons garlic, minced
- 1/2 teaspoon fresh ginger, minced (optional)
- 4 tablespoons honey
- 2 tablespoons soy sauce
- Fresh parsley / green onions, chopped (optional)
Instructions
- Combine the honey and soy sauce and set aside.
- Over medium-high heat in a 10″ skillet, pan-sear the chicken in some oil. Reduce heat to medium after searing the first side.
- Cook them on both sides in batches until browned, about 3-4 minutes per side, or until the center is no longer pink and a meat thermometer reads 165°F. Drain chicken on paper towels and remove most of the oil from the pan.
- Add garlic and ginger (optional) and saute for 30 seconds until fragrant. Add the chicken back into the pan.
- Pour in the honey and soy sauce mixture and bring to a gentle boil over medium-low heat until the sauce is reduced. Flip the chicken to coat in the sauce fully.
- Dish and serve hot.
- Enjoy!
Notes
- Add more flavor – Add some heat with a few dashes of red pepper flakes. You can cut the sweetness of the sauce with some apple cider vinegar or a drizzle of lime juice. For a smoky flavor, do a finishing drizzle with sesame oil or sprinkle with toasted sesame seeds.
- Scroll up to RECIPE TIPS for more useful tips, suggestions and ingredient substitutions.
- Prep Time: 5 mins
- Cook Time: 15 mins


Comments & Reviews
Very delicious
This was delicious, fast, and cheap. Served this with rice. I will definitely be making this again.
That’s what I like hearing! Cheap, easy, approachable and quick. I’m glad you enjoyed it, Dana and hope you enjoy it as much the next time you make it.
This was soooooo good! Instead of using the boneless skinless thighs, I had whole thighs, cut the bone out, left the skin on. I pan fried the chicken with salt and pepper, then did the sauce. I went a little heavier on the ginger and garlic (but my household likes strong flavors). Served it on rice, poured the sauce on top, and garnished with sesame seeds, green onion, and Sriracha. Next time I’m definitely gonna add sesame sauce. I may also do a cornstarch slurry to thicken the sauce, but idk. It was really good as is.
This is totally going into regular rotation. Thank you for the recipe!
You’re making me hungry! I bet that skin tasted so good with the caramelized sauce on it. I’m glad you were able to customize it to your tastes and thanks for sharing them. Sesame oil will definitely amp the flavor up a bit as a finisher – I love using it on many things.
This was quick, easy and delicious. I used skin-on chicken thighs and since this was my first time with the recipe, followed it exactly … except I used ground ginger, not fresh. This recipe is definitely a keeper and would even be great for a casual dinner get together.
Yum! I love chicken thighs – they are so juicy. I’m hoping those skins crisped up nicely too after searing.
This recipe Rocked! It is soooo delicious!!! I used low salt soy sauce and used some red pepper flakes and a little lime juice. I made 1/2 more of the honey & soy sauce and mixed it with the rice I served with it. I used same skillet and served rice on bottom and put chicken on top and poured the juices on top of chicken! This was so yummy! Everyone loved it and I’m usually critical with myself when I try new recipes! Honestly, I thought it was so easy and I thought I was eating in an upscale restaurant tonight! Lol. Try it! It’s my favorite Now!
Wow, that sounds amazing! I’m glad the ‘add more flavor’ option worked out so well for you. Making more of that sauce and letting it soak in the rice is a great way to enjoy the meal. Now I’m hungry!
So delicious! Going to try a little heat!
So glad you liked it! Enjoy the chicken the next time you make it 🙂
I loved your receipe and tried today exactly How you mentioned. Its was super tasty. I love your receipes as they are Quick and simple . Waiting for more surely.
I’m so happy you like it so much and thank you for your sweet comment. Let me know if you try anything else!
Can you use powdered garlic and ginger? How much?
Absolutely. I have substituted minced garlic many times for garlic powder in this recipe. It’s much easier than using cloves. I would do 1/4 teaspoon garlic powder and 1/8 teaspoon powdered ginger (it’s pretty potent).
I’m going to add these substitutes to the recipe card.
do you have to use ginger?
No, you can leave it out if you don’t like the taste!
Omg, this was super delicious! My family loved it, including my husband amd daughter which are food critics. I added just a hint of pink Himalayan salt for a bit more flavor. Starting v with low sodium soy sauce was perfect! Thank u for sharing.
You’re very welcome, Ine! Thank you for trying it out and I’m glad it passed the food critic test 😉 Low sodium soy sauce is a great way to make this healthier. I’ve gone this route many times.
It came out absolutely delicious. Thanks for the recipe. Kids went crazy over it. We actually had it twice, last night and a few nights ago…. I used an electric oven and the result was the same. Tks again for sharing. ??
Thanks for trying it out! Great to know it’s kid-approved. You sure can bake this in the oven as well, that’s where a cast iron skillet comes in very handy. I’m a big fan of the sauce personally. We recently have been using it a lot in air-fryer salmon while I try to lose this pandemic weight!