An easy cheesy bacon bread appetizer for a big crowd. With creamy butter, cheddar cheese, bacon pieces and green onions!

So how about a great starter? This bread appetizer is just as loaded as this bloomin’ onion bread but instead of sourdough bread, it uses a baguette like this cheesy pesto pull-apart bread.
It also has a ton of bacon which makes everything better. And it’s a lot easier to make than the two fancy-looking appetizers I mentioned above. There’s no stress of cross-cutting your bread for those that aren’t really all that gifted in the bread cutting scene like yours truly.

Since a baguette is pretty big, this appetizer will go a long way to feed a crowd. I ended up with about 24 slices total so I would say anywhere between 6 to 12 servings, depending on how many ambitious eaters you have in your group.
It’s perfect for a big gathering, parties, potlucks, or weekend get-togethers. And it will definitely be an easy crowd-pleaser with the generous amount of butter, cheese and bacon. So let’s start making some cheesy bacon bread!
CHEESY BACON BREAD TIPS AND TRICKS
So the first thing to do is to slice your baguette crosswise into one-inch slices and to stop just before you reach the bottom. I used a serrated bread knife and ended up with about 24 slices when all was said and done.
I briefly worried about how the cheesy bacon butter mixture would stick to the vertical slices after being spread on. I mean it’s a lot of bigger bits like bacon pieces and green onions. The answer is glue. The butter should be softened, not melted and this is your glue that holds everything together. I took a pic just to show you. No more worries!
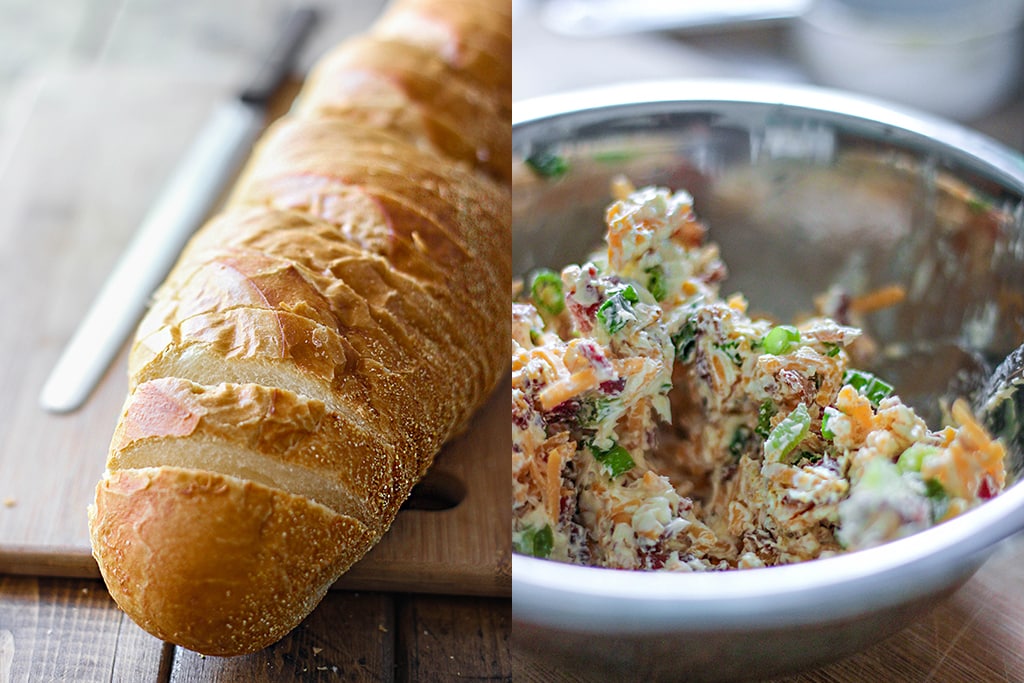
So after we slice the bread, it’s mixing time. Butter, bacon pieces or bits, cheddar cheese and green onions. Use the green parts of the onions for this. If you don’t happen to like green onions, you can substitute chives or parsley. That will work too.
And it’s spreading time. When I first started this part, which is the most time-consuming, I had a hard time trying to squeeze in the knife and butter mixture and spread well. Then I figured out a better way. Just lift up the loaf from the bottom and the slices will part beautifully like an accordion. Now you can spread easily!

Don’t worry too much about using too much of the butter mixture at the beginning. I was skimping in the beginning then had about two heaping tablespoons left after buttering all the slices. So, I’d say use about a heaping teaspoon per slice. And hopefully, you’ll do a better job buttering than I did! Spread it to the edges!
Then we wrap it up in foil so the bread doesn’t brown up before the cheese or butter has a chance to melt. Bake it for 15 minutes and that’s it. At this point, you can start gathering your group and announce your spectacular appetizer.

Use hyperboles. Gesture madly. Get them hungry and hyped up before you run away with the loaf to your secret hiding place and keep it all to yourself. No? Okay, let’s share.
Once it’s out of the oven, it’s just a matter of serving. You can finish slicing through to the bottom of the baguette to get your slices easier or just tear them off.

Serve it warm cause that’s the best way. And seriously, this is good. It’s warm and melty and crusty and bacony. Hooray for easy appetizers! Happy cooking!
MORE BREAD APPETIZER RECIPES TO TRY
Did you make this recipe? Rate it!
♡ If you liked this recipe, giving it a star rating ★★★★★ in the comments below really helps! For more recipes, subscribe to my newsletter or follow me on Facebook, Instagram and Pinterest.

Cheesy Bacon Bread
- Total Time: 25 mins
- Yield: 24 slices 1x
Description
An easy cheesy bacon bread appetizer for a big crowd. With creamy butter, cheddar cheese, bacon pieces and green onions!
Ingredients
- 1 baguette
- 1/2 cup butter
- 1/2 cup bacon bits
- 1 cup cheddar cheese, shredded
- 2 green onions, sliced
Instructions
- Cut the baguette crosswise into 1″ slices without cutting through to the the bottom.
- Combine butter, bacon, cheese and green onions and mix well.
- Spread the butter mixture on each slice.
- Wrap the baguette in foil and bake at 350 degrees for 15 minutes or until the cheese has melted.
- Dish and serve hot.
- Enjoy!
- Prep Time: 10 mins
- Cook Time: 15 mins
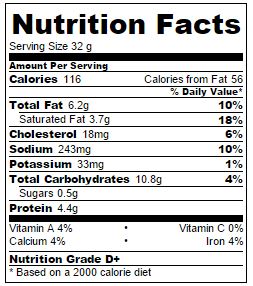
Nutrition per slice (24 slices per baguette)


Comments & Reviews
I cut the loaf into two long pieces with a V shaped cut instead of slices. Made putting the “good stuff” into it easy. It’s hard to go wrong with this one.
A special kind of lunch or a small appetizer… I love simple recipes like this one 🙂 I might have a go at this to surprise my husband (instead of the usual bread and jam)!
Love your photos as well!
Appreciate it, Sarah! Hope he likes your surprise 🙂
Dear Farah,
I’ve been reading your blog for a while but only now manage to write.
I love this idea and I eat every day a baguette 9the French style bread:-)
Now I have a question: would it mean that *both* sides of each slice get the mixture? If so, is there a danger that the mix at the bottom may disassemble and fall down while holding the slide in my hand? How would you recommend such an appetizer be eaten? (I guess, it’s a finger food type?) I’m just trying to imagine if it gets in the hands of little children running around…
Thank you very much!
I look forward to hearing from you soon.
All the best!!
Hello! I buttered each slice on one side only. I worked on the left side of the baguette, buttering the right side of the slices until I reached the middle then turned the whole baguette around and worked on the other side, buttering it on the right side again. That’s about it!
The bacon bits and green onions will stick pretty well to the slices once it’s baked and ready so I suppose it can be eaten on the go? But since the bread tends to flake easily, with all those crumbs everywhere I recommend staying at the table 😉
This cheesy bacon bread is just making me drool – totally obsessed with all that delicious stuffing inside!
I know, right? Always up for a chance to include bacon somewhere 😉
This looks SO delicious but SO naughty!
It’s well worth it, Cate!