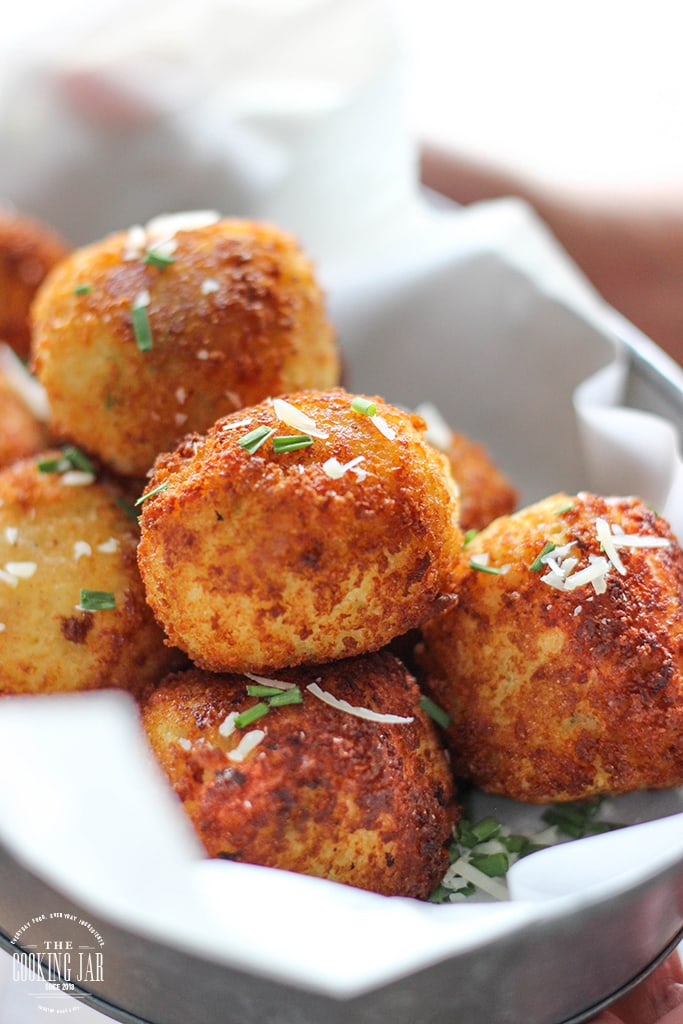
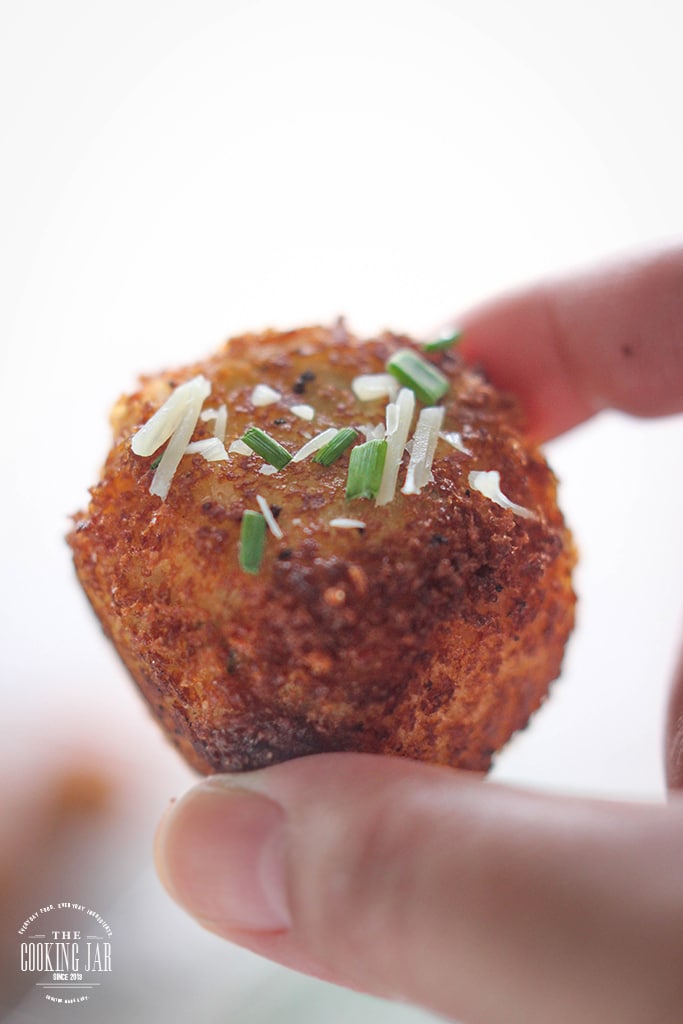
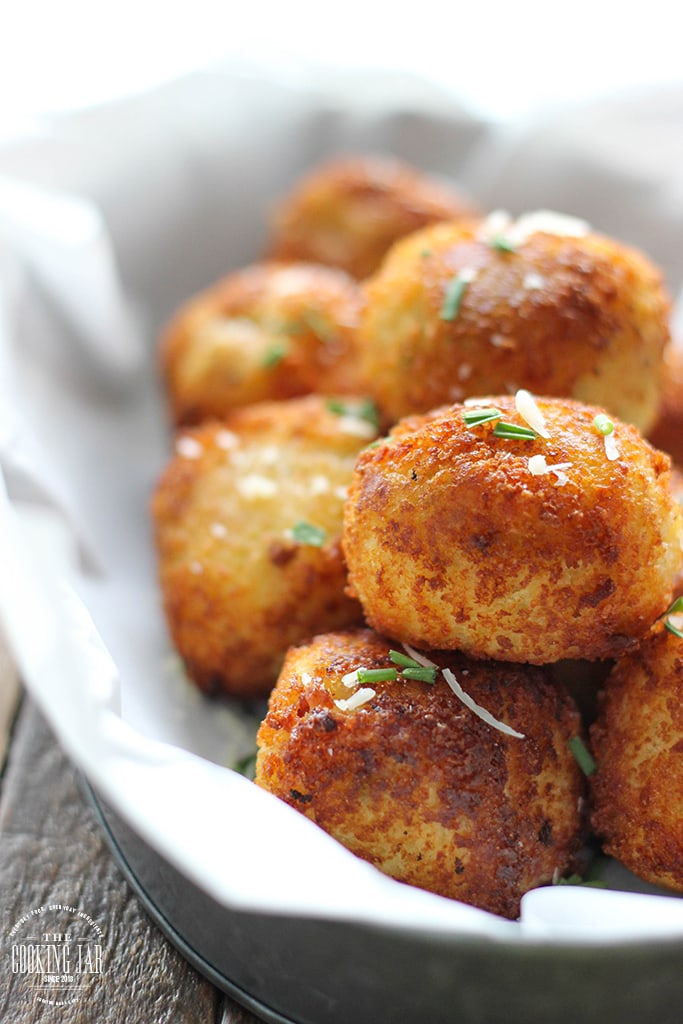
Loaded mashed potato balls are crispy on the outside but soft and creamy on the inside with loaded mashed potatoes covered in a panko-Parmesan breading and pan-fried until golden. Impress your guests at potlucks, parties and holiday dinners!
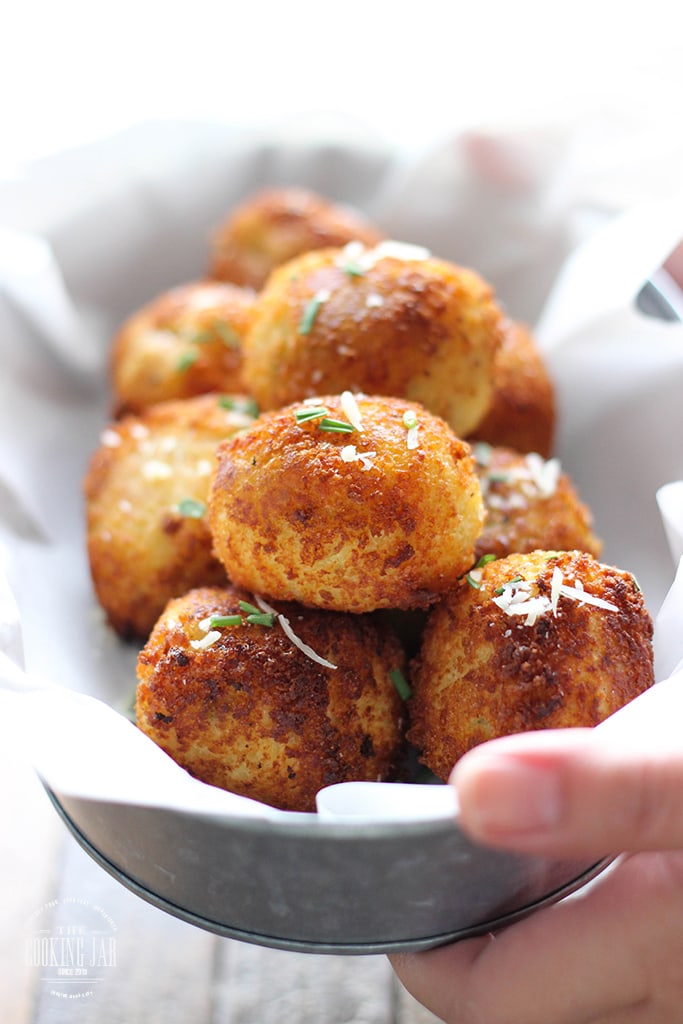
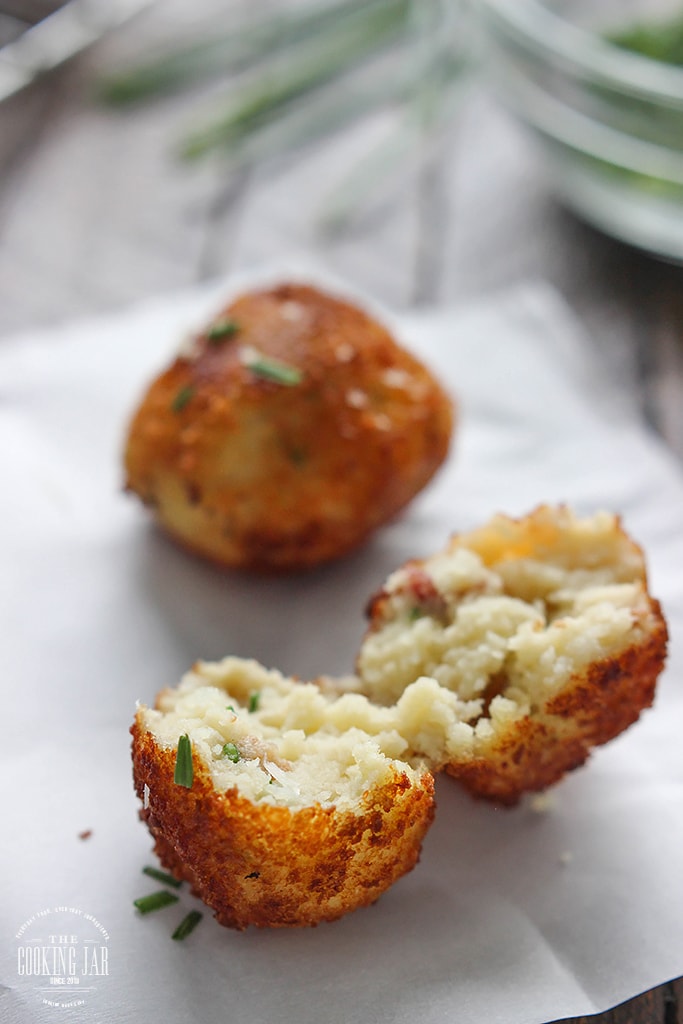
If you’ve ever had something that’s crispy on the outside but so fluffy and soft on the inside, you’ll understand just how tasty these loaded mashed potato balls are. It’s like having ice cream with your hot apple pie. Hot and cold. Crispy and soft. Extremes like these are so much fun.
We’re taking mashed potatoes and mixing them with cheddar cheese, bacon bits and chives. That there will be the fluffy. Then we’re dredging them in a Parmesan-panko bread crumb mixture. This will be the crunch. Crispy yet creamy. Happiness awaits!
We’ll use the magic of a spoon to keep breading fuss minimal. You won’t even have to get your hands dirty while breading! I’ve refined the technique a little for minimum mess and stress. Let’s begin!
How To Make Loaded Mashed Potato Balls (1 Min Video)
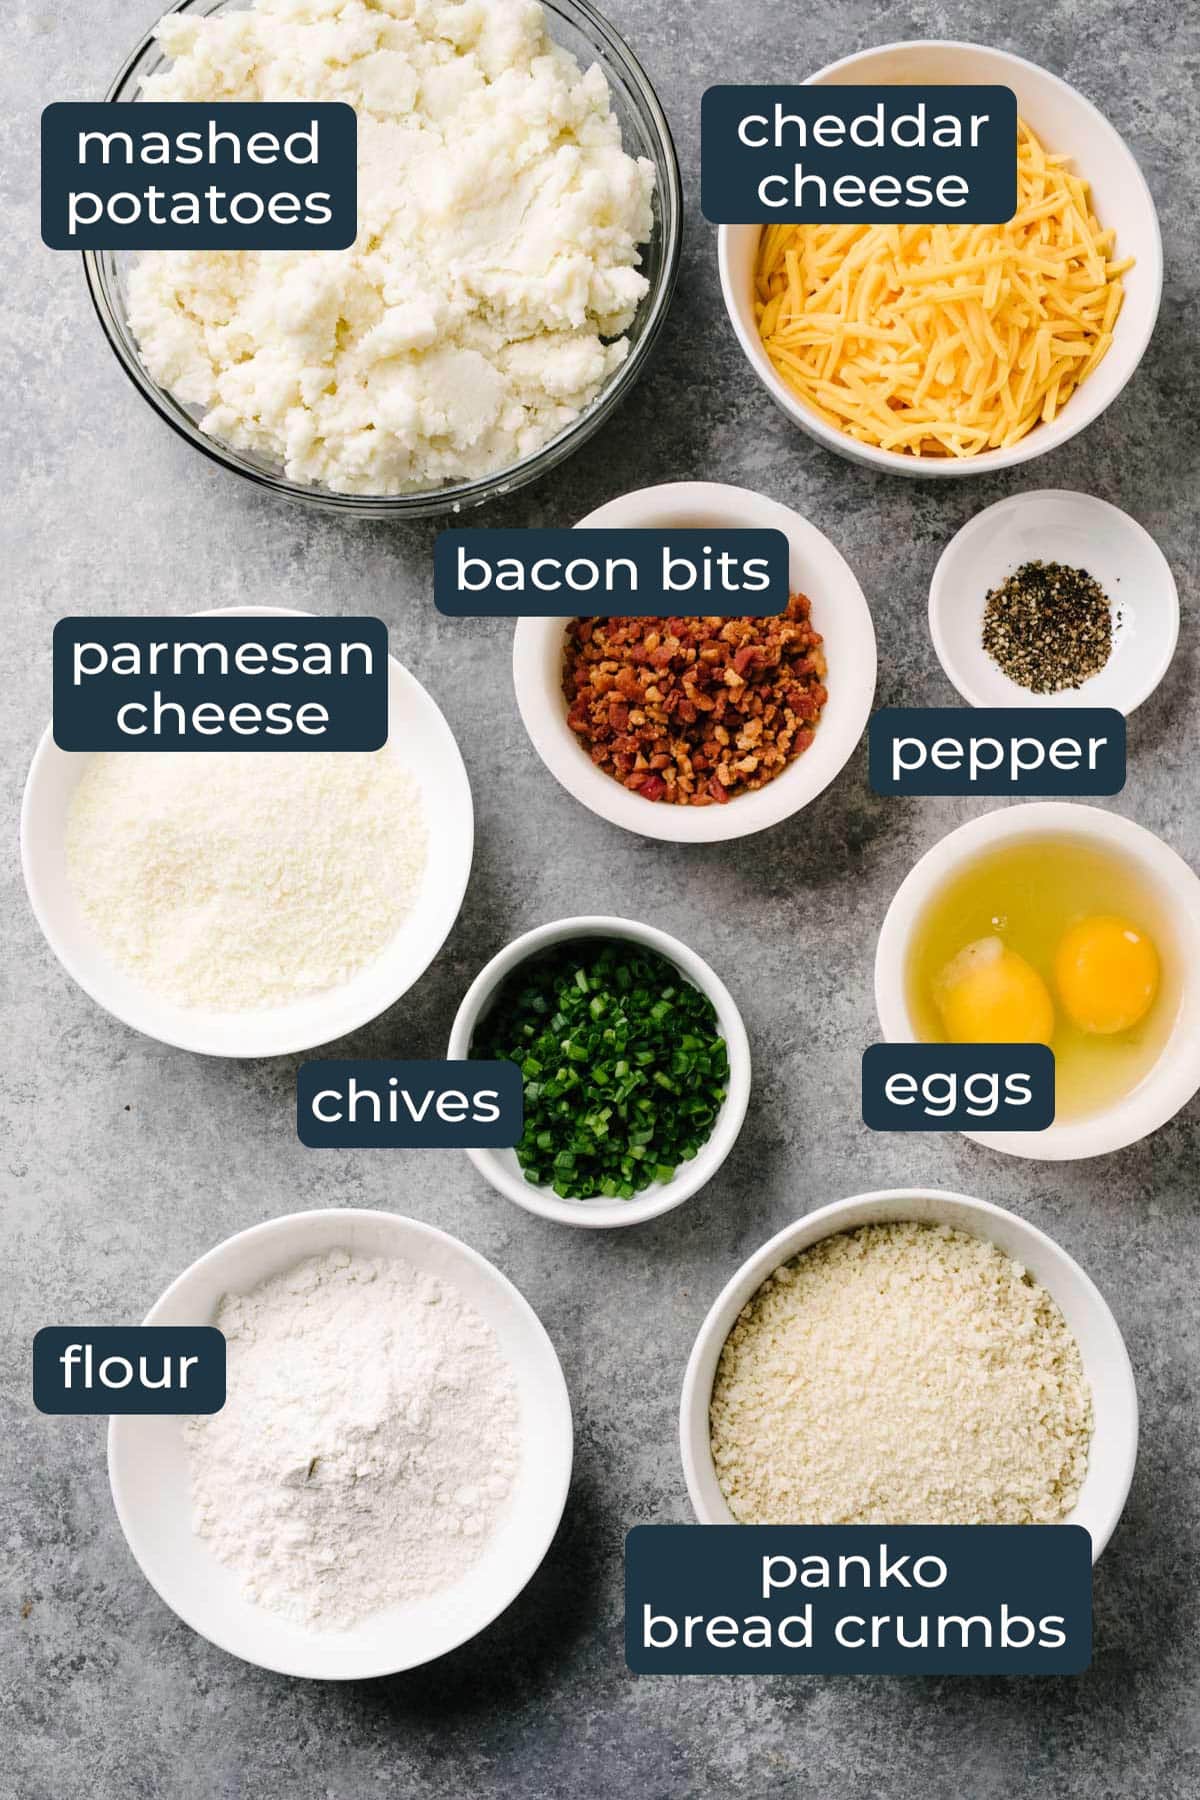
Ingredients in Loaded Mashed Potato Balls
LOADED MASHED POTATO BALLS RECIPE TIPS
Just like mashed potato puffs, you can use leftover mashed potatoes or make mashed potatoes just to make these balls. The recipe even works with instant mashed potatoes if you feel like cheating a little. Just make sure to chill the mashed potatoes beforehand so they’re easier to handle and won’t fall apart in your hands. Once they’re ready, mix them up with cheddar cheese, bacon bits, chives and pepper to taste.
Then we’ll make them into balls. Just like I did with my meatballs, I used an ice cream scoop to make uniform-sized balls. You should get about 24 balls for 3 cups of mashed potatoes. Dusting your hands with flour before rolling them into balls really helps with the sticking. Pat them gently at first into ball-sized shapes before rolling them gently in your palms to finish them off. Do this until you finish making all the balls.
We’ll be doing this stage by stage so there’s less hand washing in between. If your hands get coated with too much mashed potatoes, a trick I learned was to get more flour and rub them in your hands over the sink. The flour will help clump them all up and get them off your hands. You want minimal hand washing during the ball-forming stage because your hands should be dry so the potatoes don’t stick.
The hard part is over! Now onto the breading stage. You’ll want one bowl with beaten eggs and one bowl with the Parmesan-panko mixture. Each bowl is equipped with a handy spoon so your hands don’t get dirty. I used panko bread crumbs because they’re crispier and flakier than the regular kind.
First, drop a ball in the egg mixture. This is the glue to get the bread crumbs to stick. Flip it over and around with the spoon until all sides are fully coated. Now use the spoon to pick it up and tilt it at the edge of the bowl to remove any excess egg. You’ll want to do this because too much egg drippings into the bread crumb mixture will clump it all up which doesn’t make it stick.
Drop the ball in the bread crumb mixture and use the bread crumb spoon to heap it all over until fully coated. Use the back of the spoon to pat it in. You can also choose to pat in any excess bread crumbs with your hands after this without getting your hands clumpy with breading. That’s one ball down! The breading stage will take up the bulk of your time so don’t stress if it’s taking too long.
Finish breading all the balls and we’re onto the frying stage. Make sure your oil is hot before frying so the breading doesn’t come off and stick to the pan. It’ll strip all that breading right off. Pan fry in batches or deep fry if you want to. I just coated the bottom of the pan with oil and rolled them around to brown them evenly. The important thing to remember is to be gentle when frying, they’re still fragile and an accidental stabbing will ruin your perfect balls.
If you’re not a fan of frying, you can choose to bake these. I estimate about 5-10 minutes or until browned. If you feel baking them doesn’t brown them as much, you can also choose to toast the panko bread crumbs in a pan over medium-high heat until they are browned before breading them. No oil is needed, just heat them up in the pan and move them around until evenly browned. Mix it with the Parmesan and use that for the breading. Then bake it!
Customize It!
- Substitute chives – Try substituting chives with some chopped parsley or fresh green onions.
- Add a cheesy center – Press a cube of hard cheese into the center of the balls before coating it in bread crumbs for a gooey cheesy center. Try mozzarella or sharp cheddar or experiment with other cheeses!
- Add more flavor – Try adding a little sour cream or cream cheese to your loaded mashed potatoes for more flavor. Or add some minced garlic for garlicky balls.
That’s about it. Enjoy the mashed potato balls and happy eating. Let me know how you liked them, what substitutions you made or what you served them with in the comments below!
MORE POTATO RECIPES TO TRY
- Mashed Potato Puffs
- Crispy Garlic Parmesan Smashed Potatoes
- Garlic Parmesan Sweet Potato Stacks
- The Best Creamy Potato Salad
- Slow Cooker Mashed Potatoes
Did you make this recipe? Rate it!
♡ If you liked this recipe, giving it a star rating ★★★★★ in the comments below really helps! For more recipes, subscribe to my newsletter or follow me on Facebook, Instagram and Pinterest.
Loaded Mashed Potato Balls
- Total Time: 30 mins
- Yield: 24 balls 1x
Description
Loaded mashed potato balls are so crispy on the outside but soft, fluffy and creamy on the inside. Impress your guests at potlucks, parties and holiday dinners!
Ingredients
Filling:
- 3 cups chilled mashed potatoes
- 1 cup cheddar cheese, shredded
- 1/2 cup bacon bits
- 1/4 cup chives, chopped
- Pepper, to taste
Breading:
- 1/2 cup flour
- 2 medium eggs, beaten
- 1 1/4 cup panko bread crumbs
- 1/2 cup Parmesan cheese, grated
Instructions
- Combine the filling ingredients in a large mixing bowl and stir to mix well.
- Prepare the breading stations with one bowl of flour, one bowl of beaten eggs and one bowl of panko bread crumbs mixed with Parmesan cheese.
- Dust your hands with flour and use an ice cream scoop to measure the balls. Pat them gently to form them into balls and roll them in the palm of your hands to get them perfectly round.
- Dust them immediately with flour and set aside. Repeat until you have 24 flour-dusted balls.
- Drop a ball into the egg mixture and use a spoon to flip it over until fully coated. Lift the ball with the spoon and tilt the spoon at the edge of the bowl to drain off any excess egg.
- Drop it in the panko mixture and use another spoon to dredge it fully. Pat in any excess bread crumbs. Set aside and repeat with the remaining balls.
- Fry in batches in hot oil over medium-high heat until golden brown on all sides, about 3 minutes. Drain on paper towels.
- [If baking] Bake at 400°F for 5-10 minutes or until browned.
- Dish and serve hot.
- Enjoy!
Notes
- Substitute chives – Try substituting chives with some chopped parsley or fresh green onions.
- Add a cheesy center – Press a cube of hard cheese into the center of the balls before coating it in bread crumbs for a gooey cheesy center. Try mozzarella or sharp cheddar or experiment with other cheeses!
- Add more flavor – Try adding a little sour cream or cream cheese to your loaded mashed potatoes for more flavor. Or add some minced garlic for garlicky balls.
- Scroll up to RECIPE TIPS for more useful tips, suggestions and ingredient substitutions.
- Prep Time: 20 mins
- Cook Time: 10 mins


Comments & Reviews
Great – very versatile. They froze easily too. We cooked them in a preheated air fryer at 400 for 10 mins. The first time we didnt spray them with oil so they were too dry but after a little olive oil spray they were perfect
I love hearing how this recipe works in the air fryer! Makes you feel slightly less guilty about eating it! 🙂
Can I omit the bread crumbs?
I would not. You need them to hold the mashed potato balls together and keep their shape. I doubt the flour on its own will be good enough to do that.
Omg these are delicious! Just made them in the air fryer! Spritzed with olive oil and baked at 400 for 10 minutes turning half way. So good!! Thanks for sharing the recipe.
Thanks for letting us know these work just as well in the air fryer. This is great news!
Hello. My family and I used to make plain old potato cakes out of leftover mashed potatoes from our holiday dinners. After trying this recipe, we may never make a plain old potato cake again. These were very delicious. Thank you for sharing.
You’re welcome, Jeffrey! I’m happy to have helped you find a new holiday family staple. Enjoy and have fun making them again next year.
I found that the best way to bread anything is to keep a “wet” hand and a “dry” hand. It is only when you mixed the two up when you get into trouble. Also making sure you chill it in the freezer for 15-20 minutes before breading makes the process much easier.
Great tips, David! I usually have a wet and dry hand when I season things but find it easier to just use utensils for breading with egg. Learned the hard way with big, fat breaded fingers ?
Have you tried this in air-fryer? Or any breaded food for that matter?
Can’t say that I have. I don’t own an air fryer so I can’t really comment on it much.
Worked great for me in the air fryer. Crisped nicely and was a lot less greasy than a regularly fryer.
That’s great to hear and thank you for sharing, Nadu! I bought an air fryer since replying to this comment in 2020 but have yet to test this old recipe of mine in it. So I’m really happy to hear such positive results from those who have. Thank you!
You commented that you can make these before hand, then heat in a 350 degree oven. Have you actually done this?
If so, how long do I need to bake them?
The comment was in reply to my understanding that they have already made it, fried it and just wanted to reheat. I could have misunderstood ‘made ahead’. If you haven’t cooked them and want to try baking it, I suggest trying step 8 in the recipe. I personally have not baked these balls but larger versions of croquettes so the baking suggestions are approximations based on that experience. I would also suggest toasting the panko bread crumbs in a pan to brown them evenly before breading and baking them.
These looks so tasty! Thanks for sharing 🙂
Most welcome, Lorraine! Happy eats 🙂
These look sooo tasty!!! Definitely adding them to my list of food to make!
Glad to hear it! I hope you won’t have too much trouble during the breading stage. Enjoy!
Mmm these look and sound delicious! Thanks for sharing.
You’re welcome, Lucy! They were truly yummy. It barely lasted a day in my house.
Have you tried them baked too? Did they turn out well? I’m generally not much for cooking in oil. 😀 Sounds really good though! Might have to try them, my last foray into the dipping station thing was a batch of scotch eggs… they didn’t turn out so well. Ha! Or rather I should say they were very very messy, they still tasted pretty good however.
I haven’t baked these particular ones but I did bake the tuna croquettes which are larger in size. Turned out good. So applying the same technique, these can be baked too. I would suggest toasting the panko bread crumbs in a pan before breading them if you go the baking route. Just so they’re browner and crispier. Baking tends to brown breading a little unevenly so that fixes things. Of course, it’s not gonna be as tasty as fried but it’s still great! And trust me, I’m not a big fan of breading either but some things are worth the hassle. 😉
These look divine! What a delicious snack Farah. Problem is I don’t think one bowl will be enough for me 🙂 , these balls are loaded with everything I love!
I will admit, the hubby and devoured more than 80% of the balls in less than a day. They were not too bad cold or heated up the next day, but the best is when they’re fresh and hot!
How do you heat them up if made ahead for a pot luck or family gathering?
Try doing it in an oven on a wire rack at about 325 degrees F until they are all heated up. Microwaving will make them soggy. Also space them out from each other so they don’t end up steaming while they bake which will make them soggy as well.
Oh my, these morsels of deliciousness are gorgeous!! Excellent instructions & tips….you make it seem so easy. Pinned. Definitely making soon. Thanks for sharing.
I think the execution is easy-ish in theory but a little time consuming. But I do hope the instructions helps people from having clumpy, battered hands and balls that fall apart while forming and balls that fall apart while cooking! Good luck making them and I hope you enjoy it, Mary!
Hi Farah I am wondering if you have ever tried freezing these?
Can’t say that I have. Maybe someone who has tried it can chime in for future reference? 🙂
I freeze them, and it works beautifully! Makes them easier to work with and hold together!