These cute hash brown egg nests with avocado are fun to make with shredded hash browns and cheese baked into a crispy nest then topped with an egg, crumbled bacon and even more cheese.

These egg nests will make your grumpy mornings not so grumpy. I’m not a morning person so I can relate. But if you’re the type to be bright-eyed and bushy-tailed in the mornings, this will make things even better. I’ve also found these nests are super popular around Easter, Mother’s Day, and Christmas mornings so this is something you can make together as a fun group activity.
Pair it with creamy chilled avocado slices for that hot and cold combo. While you’re busy chasing around that runny egg with crispy hash browns, bacon, and melty cheese, you can nip out a corner of chilled avocado to add to your fork. Yummy!

And if these egg nests are too delicate for you, you can try out a whole hash brown breakfast quiche instead. This one is equally fun to make but has even bigger portions and is filled with custard, zucchini, mushrooms, and bacon.
But back to these super cute, tiny nests! Let’s get started.
How To Make Hash Brown Egg Nests (1 Min Video)
HASH BROWN EGG NESTS RECIPE TIPS
‣ Muffin pan – I used a non-stick regular-sized muffin pan then sprayed it down with nonstick spray to prevent the nests from sticking and falling apart when you try to pry it out. Make sure to wait for a little once they are out of the oven for them to cool down, settle and solidify or they will fall apart. Once cooled, use a butter knife and work your way around the edges to loosen it from the muffin pan before prying them out gently.
‣ Making a nest – You’ll want to fill each muffin mold up with shredded hash browns and then using your fingers, press down in the middle to create a depression and force the hash browns to cover the sides. The more it sticks out the better! This is what makes it look like a nest.
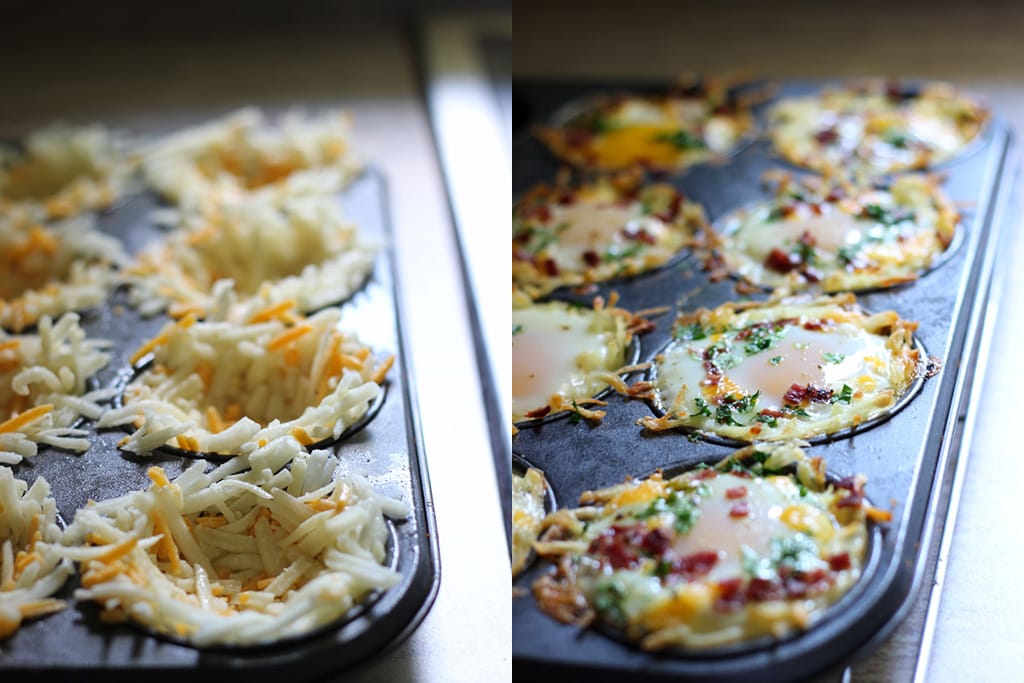
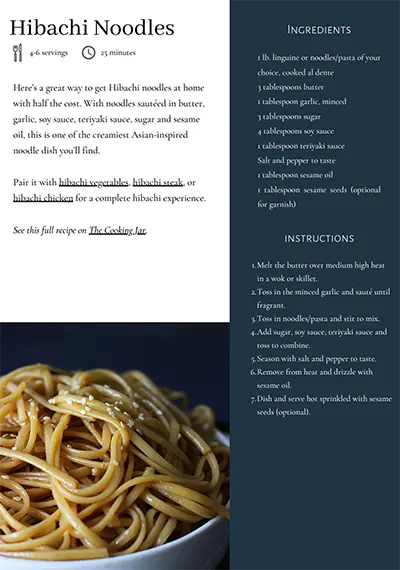
‣ Blind baking – Pre-bake the nests so it sets before adding in the egg. This is to provide a firm base and foundation for your egg and toppings. Once that’s done crack the eggs into each nest and top with bacon bits, cheese, and parsley. Then bake again until the egg whites settle. You can opt to bake a little longer if you don’t like your eggs runny.
‣ Scrambled – If you’re not a big fan of sunny-side-up eggs, you can beat the eggs beforehand instead.
‣ Avocado – Feel free to leave out the avocado if you’re not a fan. The sensation of hot nests with creamy chilled avocado is a fantastic combination but if you only want the nests, this can be skipped.

Ta-da! You have breakfast. Or brunch, or a snack. Whatever time you decide to eat this, you will be munching happily. Serve with fresh chilled avocado slices or skip them if you’re cursed like me with two settings: unripe avocados and too-bad-you-missed-the-one-day-I-was-ripe avocados.
MORE BREAKFAST RECIPES TO TRY
- On-The-Go Breakfast Muffins
- Healthy Egg White Breakfast Muffins
- Cheesy Sausage Hash Brown Breakfast Casserole
- Hash Brown Breakfast Quiche
- Easy Hamburger Quiche
- Idaho Sunrise
Did you make this recipe? Rate it!
♡ If you liked this recipe, giving it a star rating ★★★★★ in the comments below really helps! For more recipes, subscribe to my newsletter or follow me on Facebook, Instagram and Pinterest.

Hash Brown Egg Nests with Avocado
- Total Time: 40 mins
- Yield: 8 nests 1x
Description
Shredded hash browns and cheese nests baked until crispy topped with a baked eggs, crumbled bacon and more cheese. Served with chilled avocado slices.
Ingredients
- 15 oz. frozen shredded hash browns, thawed
- 1 1/4 cup cheddar cheese, shredded and divided
- 1 tablespoon olive oil
- Salt and pepper to taste
- 8 medium eggs
- 2 slices cooked bacon, crumbled/2 tablespoons bacon bits
- 1/2 tablespoon parsley, chopped
- 2 avocados, sliced and chilled (optional)
Instructions
- Mix the shredded hash browns, 1 cup of cheddar cheese, olive oil and salt and pepper to taste in a mixing bowl.
- Grease a non-stick regular muffin pan and divide the hash brown mixture. Use your fingers to pack them tightly and shape them into nests.
- Bake at 425°F or until the edges have browned and the cheese has melted, about 15 minutes.
- Crack a medium egg into each nest and season with salt and pepper to taste.
- Top with crumbled bacon, remaining 1/4 cup cheddar cheese and parsley.
- Bake at 350°F until the egg whites set, about 13 to 16 minutes.
- Let it cool, gently slide a knife along the edges and use a fork to lift it out of the pan.
- Dish and serve with chilled avocado slices (optional).
- Enjoy!
Notes
If you don’t have frozen shredded hash browns, bake 4-6 russet potatoes. Let them cool off, then peel and grate them to form shreds.
- Prep Time: 10 mins
- Cook Time: 30 mins


Comments & Reviews
Our family wanted to try these but my husband and a daughter are dairy intolerant. We did with the grand idea of using half a cup of liquid boxed egg whites to hold the nests together instead of the cheese. They were fantastic! The egg protein did the trick and we all enjoyed picking our herbs of choice to go on top with the bacon. I did add a bit of salt to the nests to make up for the salt missing from the cheese. Seriously, with the perfectly ripe avocado, the bacon crumbles and fresh herbs, we didn’t even miss the cheese. (We have already made them twice and we find that the Simply Potatoes 15 oz bag actually does all 12 muffin tins.)
Great idea in place of cheese, Jen! Thanks for sharing and hopefully other people who can’t take cheese can try this out! Glad to know 15 oz. works for 12 muffins this way too 🙂
Have you ever done these without the cheese for a dairy free option? Just wondering if the cup would hold together as well
There’s not as much cheese to hash brown ratio as you might think so the glue effect that comes with cheese is minimal, I think. You should be good to go without cheese! I personally have not gone the no cheese route, but I’m positive it’ll be fine.
Thank you so much for posting this! I’ve been searching all over for a great breakfast recipe that I can bring to a holiday party, and I’m totally going to make these! So clever and creative.
🙂
Hey, Laura! Hope the people at your party enjoy it. Happy holidays! 🙂
These look awesome! You didn’t even need the avocado!
They’re good by themselves, yes! With or without avocado, both work. I just love chilled avocado with my breakfasty stuff. Thanks for the comment, Donna!
These look amazing! I am wondering if I could make just the nests and freeze those for my kids, then just pop in the eggs and put them in the oven. I have 6 little ones, and I like to have breakfast mostly made the night before. My one problem every time I make these egg cup dishes is that the yolks are always overdone for my liking. I like them super runny, but the white is never set enough. I showed my kids the picture and they want these for breakfast.
You should be able to since it’s just the hash browns and not the eggs. As for the runny yolks, just check around the 13-16 minutes mark if your whites are set. Some ovens run a little differently. Once they’re set, you should be good to go for runny yolks!
wow – those look amazing! Love that the yolk is still runny! Will have to make these for my kids!
I love runny yolks! Hope your kids like it, Dave!
Hey Farah ,
This is an amazing breakfast food .Thanks for sharing your beautiful reciepes with us …
You’re very welcome, Tan! Enjoy!
Hi – I just came across your recipe tonight and it sounds and looks wonderful. And, I’m looking forward to making it! I just have one question……Don’t you need more than 1 T. of the shredded cheese to top the 8 nests?
Thank you.
Sincerely,
Susan
Thank you, Susan for the compliment! It’s purely up to you how much cheese you want to use as topping. Since a cup of Cheddar is used in the hash brown mix, the extra cheese is icing on the cake. I like being able to see my eggs peep through but if you want to shower your nests with Cheddar love, then go for it! The toppings are just a general guideline and completely customizable.
Muffin pans have 12 slots generally, but this recipe only calls for 8 eggs? I didn’t need nearly 15oz of hashbrowns for 8 muffin slots, did you reuse the hashbrown mix several times?
That was an oversight on my part. I’m used to cooking for two people so I made 8 just in case people can’t finish them all up and they won’t freeze well for those in my shoes. I’m a little leery of freezing cooked eggs. I never thought people could finish or would want to cook all 12 in one go! As for the ratio of hash browns, I like to stuff mine silly with that 15 oz. in those 8 cups. I bought a bag that came in 30 oz. and used the other half to make a second batch a couple of weeks later. Hope this helps!
These egg nests look awesome! What a clever idea for a brunch table or any time…and delicious, too. Thanks for sharing!
You’re very welcome, Jodee. It’s something to come back to and worth the hassle of delicate prying from the muffin pan. I’ve made it again since posting this and they disappeared quickly…again. 🙂
I was so excited to find your recipe this morning! What an a great breakfast idea! It looks so good! If you have a moment I would love it if you stopped over at Foodie Fridays tomorrow night (we go live at 9 PM EST) and shared this! Pinning and stumbling and sharing!
Thanks for the love and feedback, Michelle! <3
I made these for my family last week for dinner…a complete hit! I doubled the recipe (a requirement when feeding teenagers) and used two pans: a regular cupcake/muffin pan and an English muffin pan. Since the English muffin “nests” were slightly larger I ended up cracking two eggs in each nest. Every nest was eaten!!! Ha Thank you, Farah!
You’re absolutely welcome, Jaye. And thanks for trying my recipes and coming back to let me know how you liked it! 🙂
WOW! I’m drooling just reading this post! Can you make the nests the day before then the next day add the eggs, etc. and finish cooking? I’m not a morning person and would like to do most of my preparation the day/night before. Thank you!
I don’t see why you can’t! You can even make them the night before and eat them in the morning. I’ve had mine the next day heated up in the microwave. Depending on your microwave, it should take 30 seconds to a minute to heat up. And me? So not a morning person either!
Just came across this – looks fabulous! I was wondering what to do with those frozen hashbrowns in my freezer – can’t wait to try it!
Give it a go and I hope you like it! 🙂
These look great. Beautiful photography.
I am avocado cursed like you. I always buy them with the intention of using them but always leave them a little too long. I recently discovered that you can freeze them, so now I mash a few and stash them in the freezer so at least I have avocado for tacos etc.
Oh my god, I JUST discovered that a week ago too! Had some leftover avocados from this post and in a desperate bid to save them I smashed them up and put them in the freezer. Then I Googled if that’s even wise. Apparently you can! So now we have two quart bags of frozen guacamole good and ready for any guacamole emergencies. 🙂